DFIR Playbook - Disk Images
Introduction
This post aims to replicate my physical playbook on Disk Images and includes the following tools
- The SleuthKit(TSK)
- Ripl.pl
- find (Hash unallocated files without extracting... find that malware)
Contents
Overview
Broadly, the following overview, will show the basic fls / mmls commands. For each of the red circles, that is where we’re getting the inode or offset from
| Command | Description | Comments | Use |
|---|---|---|---|
mmls <filename> |
Show’s partitions and disk offsets | Usually the largest partition that starts at approximately 63 for BIOS versions of windows, and the second partition after 2048 for EFI versions of windows | 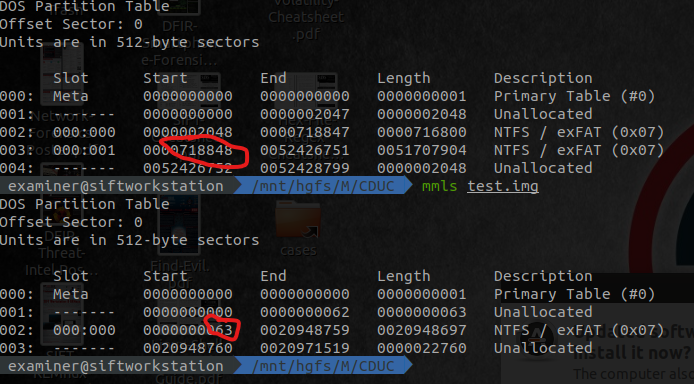 |
fls -o <offset> <filename> |
Using the offsets identified on mmls will show the contents off the root directory (ls -lah equivalent) | - | 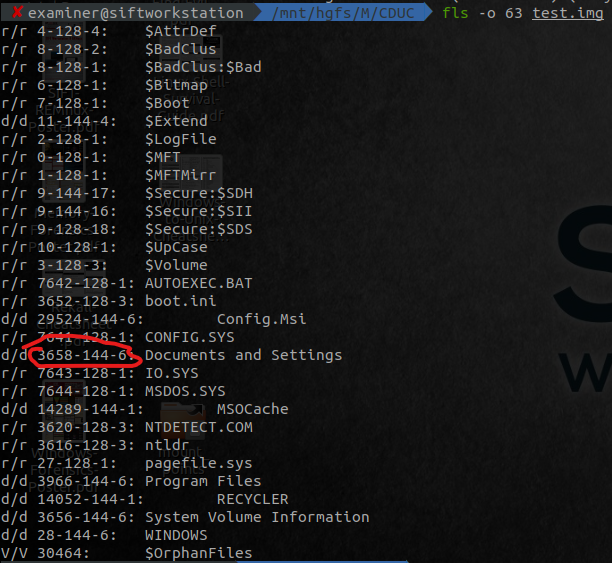 |
fls -o <Offset> <filename> -D |
shows only directories the directories avialable. | - | 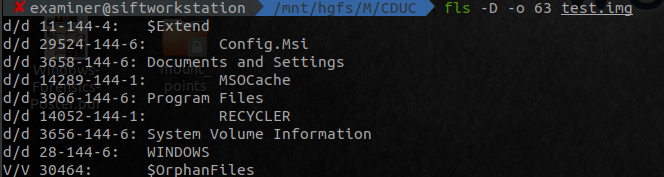 |
fls -o <offset> <filename> <inode> |
lists the contents of a given directory. | - | - 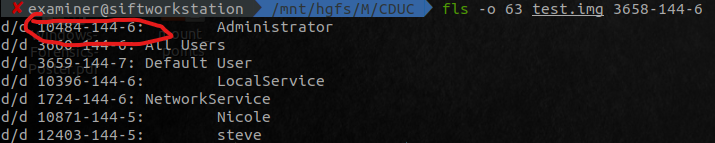 |
fls -o <offset> <filename> <inode> -r |
lists the contents of a given directory and all its sub directories | - | 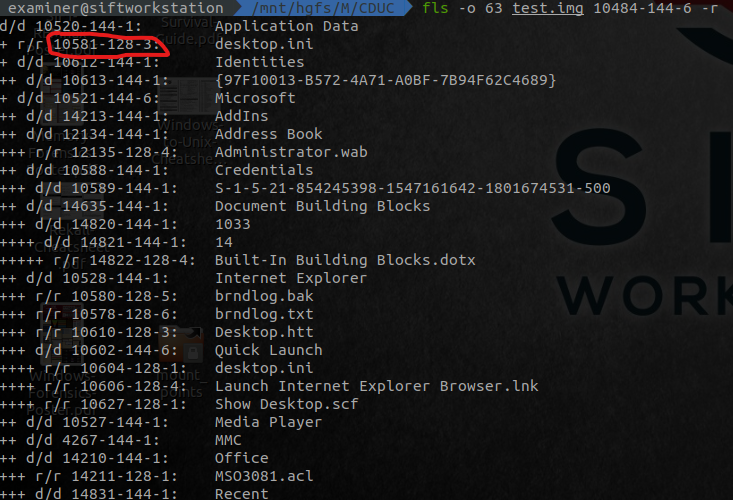 |
fls -l -z <TimeZoneofMachine> -o <offset> <filename> <inode> |
lists the times on files | Format: file_type inode file_name mod_time acc_time chg_time cre_time size uid gid | - |
icat -o <offset> <filename> <inode> |
cat’s out the file to STDOUT, can be redirected to make a copy of the file by adding > file.txt. |
- |  |
tsk_recover -o <offset> <filename> -e -d <Directory inode> |
Extracts an entire directories files, including those that are unallocated, useful for deleted files | - | 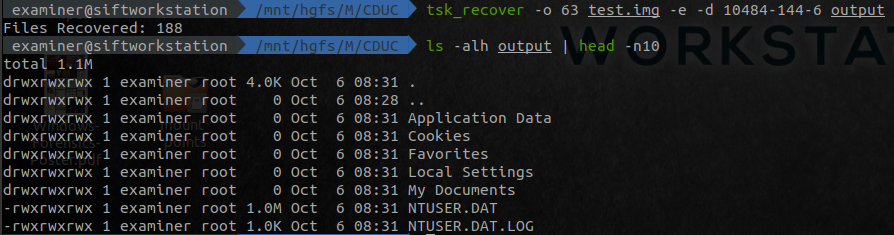 |
Using TSK to make a timeline
You can tsk for more than just extracting files. Its one of the best, and most lightweight tools to make a quick MFTTimeline, or, Filesystem timeline. And, whats better, is there is no mounting, period, thank the DFIR Gods. This makes this one of the best and quickest triage tools to use.
Triage Timeline
| Command | Description |
|---|---|
fls -o <offset> <filename> -r -p -m <PartitionLetter>:/ > <outputfile> |
Generates a tsk triage timeline bodyfile from offset. Note, you can use / for a linux partition instead of <PartitionLetter>:/ |
fls -r -p -m <PartitionLetter>:/ -d /dev/<sdx> > <outputfile> |
Generates a tsk triage timeline bodyfile note from a diskmount, you can use / for a linux partition instead of <PartitionLetter>:/ |
mactime -b <bodyfile> -d -y -z <Timezone> <StartTime> <EndTime> > <outputfile>.csv |
Creates a csv timeline from the body file. Tzformat = Australia/Sydney TimeFormat = 2000-04-20T00:00:00 NOTE: -z with <timezone> <StartTime> or <EndTime> are optional note if you are unsure of the timezones OR times dont convert correctly , you can list them with mactime -z list if you get an error that states time module not loaded, you will need to install sudo apt-get install libdatetime-perl |
grep -v -i -f timeline_noise.txt <outputfile>.csv > <outfile-final>.csv |
Reduces timeline noise |
timeline_noise.txt
Content.IE5
Temporary\ Internet\ Files
IETldCache
PrivacIE
ACPI
MSIE\ Cache\ File
\(\$FILE\_NAME\)
THREAD
DLL\ LOADTIME
MFT Timeline
| Command | Description |
|---|---|
icat -o <offset> <filename> 0 > <directory>/mft.raw |
Extracts mft from disk for enhanced timeline |
analyzeMFT.py -f <directory>/mft.raw -e -o mfttl.csv |
Generates a MFT CSV Timeline |
Quick Registry analysis
rip.pl -r NTUSER.DAT -p userassistFrom the files extracted with tsk_recover, you can quickly get the userassist keys. If you want to see other types you can use –help
Hash all files, including unallocated with find on a live linux system
-find . -type f -exec md5sum "{}" \;
Get the physical location of a file on disk
-filefrag -v <filename>
Mounting from a raw image
Pre-Requisites
Install the following packages if you are not mounting a ext4 based image
sudo apt-get install fusermount xmount afflib-tools ewf-tools qemu-utils libbde-utils libvshadow-utils
Instructions
You can mount from a raw image by confucting the following
fdisk -l <filename>
This will show an output like this for an ext4 based filesystem
Disk ./file: 64 GiB, 68719477248 bytes, 134217729 sectors
Units: sectors of 1 * 512 = 512 bytes
Sector size (logical/physical): 512 bytes / 512 bytes
I/O size (minimum/optimal): 512 bytes / 512 bytes
Disklabel type: dos
Disk identifier: 0x000bbd9c

Device        Boot Start       End   Sectors Size Id Type
./filep1 *     2048 134217727 134215680  64G 83 Linux
Then, make a directory to mount
sudo mkdir /mnt/raw
Use the output above, where the Start point is (2048) and multiply by 512 to get the offset
echo $((512 * 2048))
Which should give
echo $((512 * 2048))
1048576
Use this offset to mount readonly NOTE: you can use the -t option to specify non EXT4 type systems like ntfs or fat
sudo mount -o ro,loop,offset=1048576 <filename> /mnt/raw/
if you get the following error:
mount: /mnt/raw: cannot mount /dev/loop read-only.
Add the noload option, this allows you to mount a dirty journal, and prevents changing any data in anyway.
sudo mount -o ro,noload,loop,offset=1048576 <filename> /mnt/raw/
From the man page
           Note that, depending on the filesystem type, state and kernel
           behavior, the system may still write to the device. For
           example, ext3 and ext4 will replay the journal if the
           filesystem is dirty. To prevent this kind of write access,
           you may want to mount an ext3 or ext4 filesystem with the
           ro,noload mount options or set the block device itself to
           read-only mode, see the blockdev(8) command.
See https://www.sans.org/blog/how-to-mount-dirty-ext4-file-systems/ for further info